
Slack 리드 평가기와 Modal
Slack 리드 평가기와 Modal (Slack Lead Qualifier with Modal)
이 예제에서는 에이전트 앱을 하나 만들어 볼 거예요. 회사의 공개 Slack 커뮤니티에 새로 가입한 멤버마다 회사 상용 제품과 얼마나 잘 맞는지 자동으로 리서치하고, 그 분석 결과를 (비공개) Slack 채널로 보내며, 지난 24시간 동안의 상위 5개 리드를 매일 요약해서 (다른) Slack 채널로 보내는 앱이에요.
앱은 Modal에 배포할 건데요. Modal을 쓰면 파이썬으로 웹 엔드포인트·스케줄 함수·백그라운드 함수가 있는 앱을 정의하고 CLI로 배포하기만 하면, 인프라를 직접 구성하거나 관리할 필요가 없어요. 조직 안에서 AI 에이전트를 만들고 배포해서 업무를 편하게 하는 진입장벽을 낮추기 좋은 방법이죠.
또한 Pydantic Logfire를 추가해 웹훅과 스케줄에 반응해 돌아가는 앱과 에이전트에 대한 관측 가능성(observability)을 확보해요.
스크린샷 (Screenshots)
Slack으로 보내는 분석 결과는 이런 모습이에요:

Logfire에서 보이는 대응 트레이스는 이런 모습입니다:
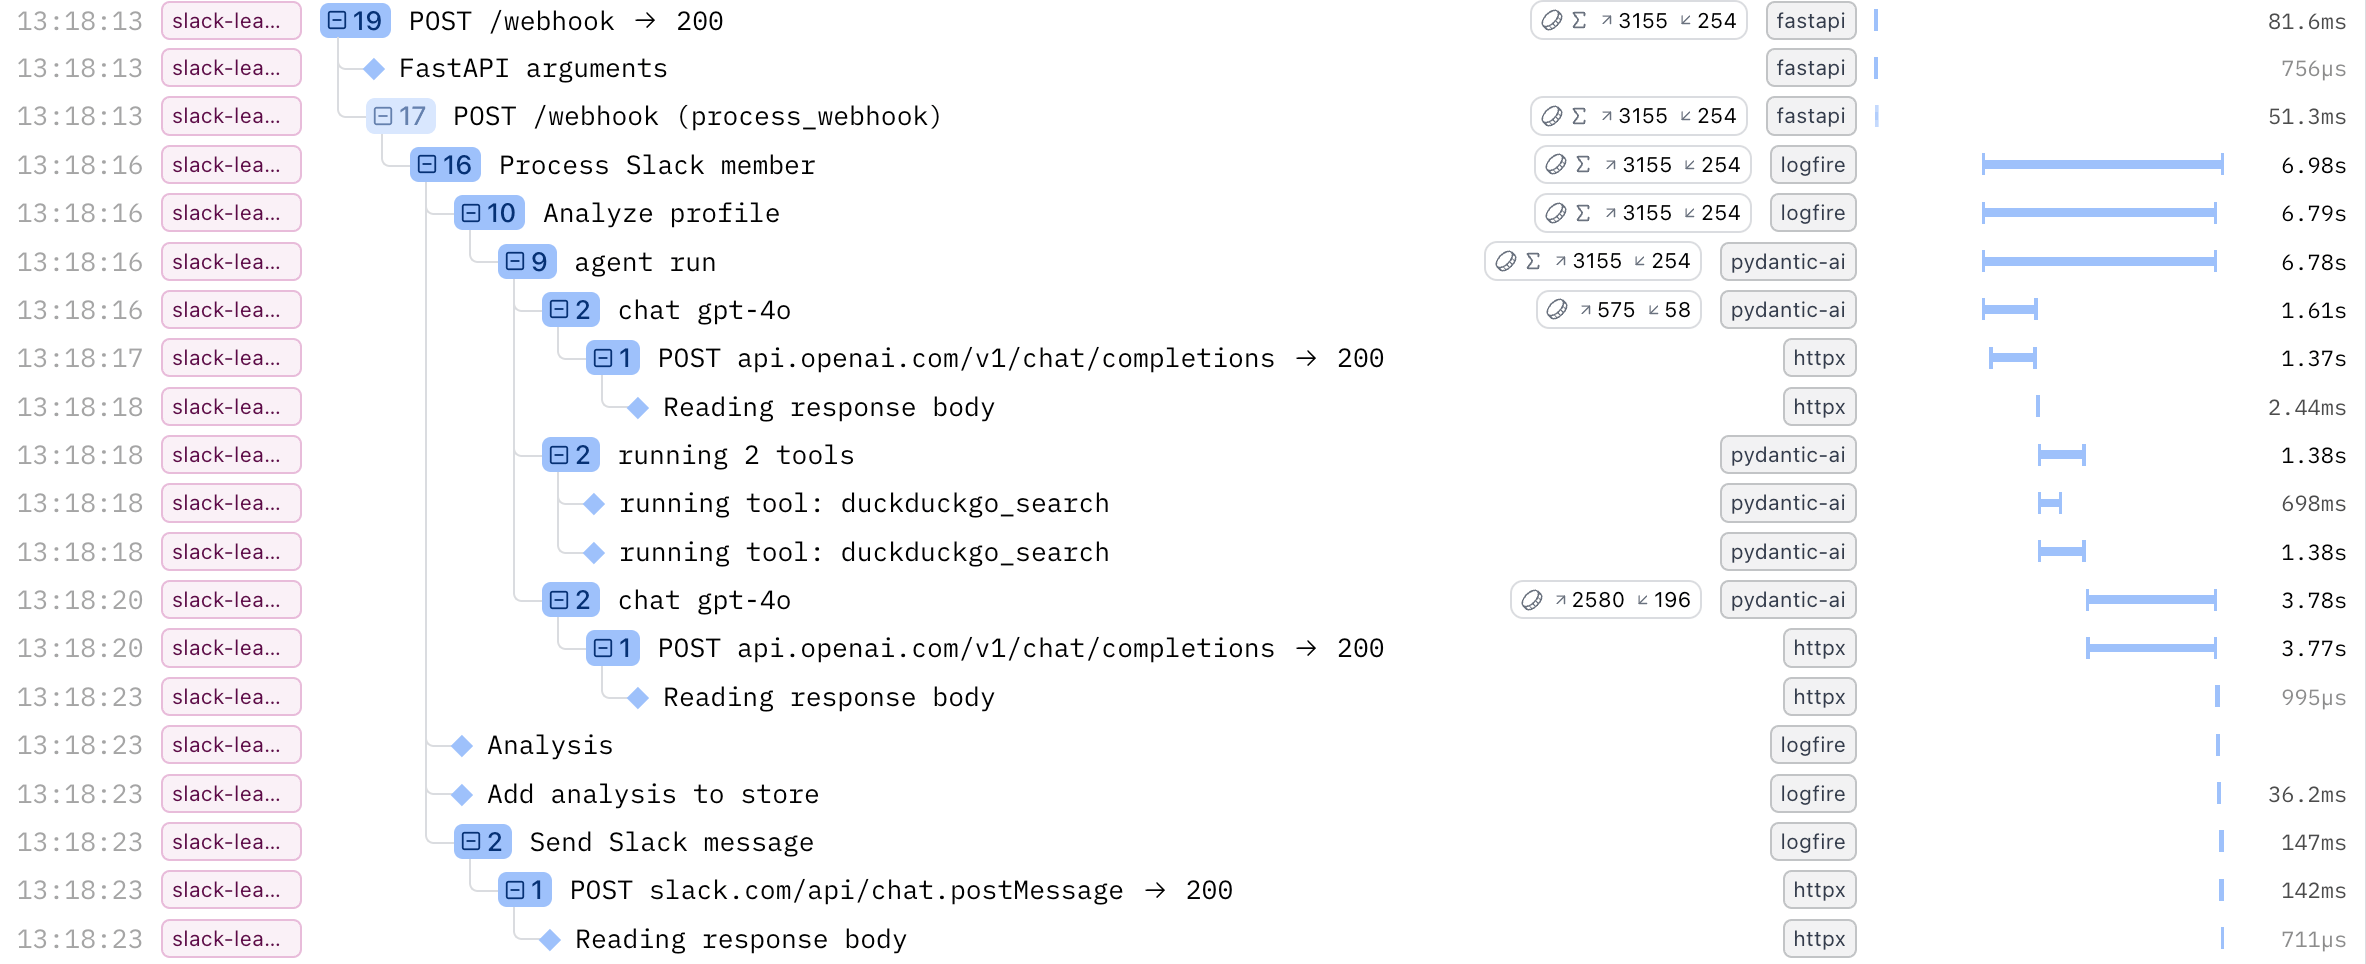
이 항목들은 모두 클릭해서 그 단계에서 일어난 일 — LLM과의 전체 대화, HTTP 요청과 응답 포함 — 을 더 자세히 볼 수 있어요.
사전 준비사항 (Prerequisites)
실행에 필요한 것들을 실제로 설정하는 수고를 들이지 않고 코드만 보고 싶다면, 코드로 바로 넘어가셔도 좋아요.
Slack 앱 (Slack app)
Slack 워크스페이스와 앱을 만들 권한이 필요합니다.
-
https://docs.slack.dev/quickstart의 안내를 따라 새 Slack 앱을 만드세요.
- 2단계 "Requesting scopes"에서 다음 스코프를 요청하세요:
- 3단계 "Installing and authorizing the app"에서 Access Token을 적어 두세요. Modal에 Secret으로 저장해야 하거든요.
- 4·5단계는 건너뛰어도 돼요.
team_join이벤트를 구독해야 하지만, 지금은 아직 웹훅 URL이 없으니까요.
-
앱이 포스팅할 채널을 만들고 Slack 앱을 추가하세요:
#new-slack-leads#daily-slack-leads-summary
이 이름들은 예제에 하드코딩되어 있어요. 다른 채널을 쓰고 싶다면 저장소를 클론해서
examples/pydantic_ai_examples/slack_lead_qualifier/functions.py에서 바꾸면 됩니다.
Logfire Write Token
- 아직 Logfire 계정이 없다면 https://logfire-us.pydantic.dev/에서 만드세요.
- 예를 들어
slack-lead-qualifier라는 새 프로젝트를 만드세요. - 새 Write Token을 생성하고 적어 두세요. Modal에 Secret으로 저장해야 하거든요.
OpenAI API Key
- 아직 OpenAI 계정이 없다면 https://platform.openai.com/에서 만드세요.
- Settings에서 새 API Key를 만들고 적어 두세요. Modal에 Secret으로 저장해야 하거든요.
Modal 계정 (Modal account)
- 아직 Modal 계정이 없다면 https://modal.com/signup에서 만드세요.
- Modal Secrets 가이드를 따라 "Custom" 타입 Secret 3개를 만드세요:
- 이름:
slack, 키:SLACK_API_KEY, 값: 앞서 생성한 Slack Access Token - 이름:
logfire, 키:LOGFIRE_TOKEN, 값: 앞서 생성한 Logfire Write Token - 이름:
openai, 키:OPENAI_API_KEY, 값: 앞서 생성한 OpenAI API Key
- 이름:
사용법 (Usage)
- 의존성이 설치되어 있는지 확인하세요.
- Modal에 인증합니다:
python -m modal setup
uv run -m modal setup
- 예제를 임시 Modal 앱(ephemeral Modal app)으로 실행하세요. 즉, Ctrl+C로 종료할 때까지만 실행됩니다:
python -m modal serve -m pydantic_ai_examples.slack_lead_qualifier.modal
uv run -m modal serve -m pydantic_ai_examples.slack_lead_qualifier.modal
Created web function web_app =>뒤에 나오는 URL을 적어 두세요. 이게 웹훅 엔드포인트 URL이에요.- https://docs.slack.dev/quickstart로 돌아가 4단계 "Configuring the app for event listening"을 따라, 앞서 적어 둔 웹훅 엔드포인트 URL을 Request URL로 해
team_join이벤트를 구독하세요.
이제 누군가(어쩌면 일회용 이메일로 가입한 당신일 수도 있어요)가 Slack 워크스페이스에 가입하면, modal serve를 실행한 터미널과 Logfire Live 뷰에서 웹훅 이벤트가 처리되는 걸 볼 수 있고, 몇 초를 기다리면 #new-slack-leads Slack 채널에 결과가 나타날 거예요!
Slack 가입 이벤트 흉내내기
원하는 이름이나 이메일로 Slack 가입 이벤트를 흉내 내 에이전트를 시험해 볼 수도 있어요:
curl -X POST <webhook endpoint URL> \
-H "Content-Type: application/json" \
-d '{
    "type": "event_callback",
    "event": {
        "type": "team_join",
        "user": {
            "profile": {
                "email": "[email protected]",
                "first_name": "Samuel",
                "last_name": "Colvin",
                "display_name": "Samuel Colvin"
            }
        }
    }
}'
프로덕션에 배포하기
이 앱을 Modal 워크스페이스에 영구적으로 배포하고 싶다면 이 명령을 쓰세요:
python -m modal deploy -m pydantic_ai_examples.slack_lead_qualifier.modal
uv run -m modal deploy -m pydantic_ai_examples.slack_lead_qualifier.modal
아마 코드를 다운로드해서 새 저장소에 넣고, GitHub Actions로 지속적 배포를 하는 걸 원할 거예요.
Slack 이벤트 Request URL을 새 영구 URL로 바꾸는 걸 잊지 마세요! 그리고 에이전트 지시문도 자신의 상황에 맞게 수정하고 싶을 거예요.
코드 (The code)
기본부터 시작해서 점차 전체 앱으로 키워 나갈 거예요.
모델 (Models)
Profile
먼저 Slack 사용자 프로필을 나타내는 Pydantic 모델을 정의해요. 이 필드는 곧 정의할 웹훅 엔드포인트로 보내지는 team_join 이벤트에서 얻는 값들이에요.
...

class Profile(BaseModel):
    first_name: str | None = None
    last_name: str | None = None
    display_name: str | None = None
    email: str

...
또한 format_as_xml을 사용해 프로필을 모델에 보낼 수 있는 문자열로 바꿔 주는 Profile.as_prompt() 헬퍼 메서드도 정의해요.
...

from pydantic_ai import format_as_xml

...

class Profile(BaseModel):

...

    def as_prompt(self) -> str:
        return format_as_xml(self, root_tag='profile')

...
Analysis
둘째로 필요한 모델은 에이전트가 수행할 분석의 결과를 나타내는 모델이에요. 이 필드가 무엇을 담아야 하는지 모델에 추가 컨텍스트를 주기 위해 docstring을 포함합니다.
...

class Analysis(BaseModel):
    profile: Profile
    organization_name: str
    organization_domain: str
    job_title: str
    relevance: Annotated[int, Ge(1), Le(5)]
    """Estimated fit for Pydantic Logfire: 1 = low, 5 = high"""
    summary: str
    """One-sentence welcome note summarising who they are and how we might help"""

...
또한 분석 결과를 Slack API에 보내 새 메시지를 포스팅할 수 있는 Slack blocks로 바꿔 주는 Analysis.as_slack_blocks() 헬퍼 메서드도 정의해요.
...

class Analysis(BaseModel):

...

    def as_slack_blocks(self, include_relevance: bool = False) -> list[dict[str, Any]]:
        profile = self.profile
        relevance = f'({self.relevance}/5)' if include_relevance else ''
        return [
            {
                'type': 'markdown',
                'text': f'[{profile.display_name}](mailto:{profile.email}), {self.job_title} at [**{self.organization_name}**](https://{self.organization_domain}) {relevance}',
            },
            {
                'type': 'markdown',
                'text': self.summary,
            },
        ]

...
에이전트 (Agent)
이제 Pydantic AI로 들어가서 실제 분석을 수행할 에이전트를 정의할 차례예요.
사용할 모델(openai:gpt-5)을 지정하고, 지시문(instructions)을 제공하며, 에이전트에 DuckDuckGo 검색 도구 접근을 주고, 네이티브 출력(Native Output) 구조화 출력 모드로 Analysis 또는 None을 출력하도록 지정해요.
앱의 진짜 핵심은 새 Slack 멤버를 어떻게 평가할지 알려주는 지시문에 있어요. 이 앱을 직접 쓰려면 그 지시문을 자신의 상황에 맞게 바꾸게 될 거예요.
...

from pydantic_ai import Agent, NativeOutput
from pydantic_ai.common_tools.duckduckgo import duckduckgo_search_tool

...

agent = Agent(
    'openai:gpt-5.2',
    instructions=dedent(
        """
        When a new person joins our public Slack, please put together a brief snapshot so we can be most useful to them.

        **What to include**

        1. **Who they are:**  Any details about their professional role or projects (e.g. LinkedIn, GitHub, company bio).
        2. **Where they work:**  Name of the organisation and its domain.
        3. **How we can help:**  On a scale of 1-5, estimate how likely they are to benefit from **Pydantic Logfire**
           (our paid observability tool) based on factors such as company size, product maturity, or AI usage.
           *1 = probably not relevant, 5 = very strong fit.*

        **Our products (for context only)**
        • **Pydantic Validation** - Python data-validation (open source)
        • **Pydantic AI** - Python agent framework (open source)
        • **Pydantic Logfire** - Observability for traces, logs & metrics with first-class AI support (commercial)

        **How to research**

        • Use the provided DuckDuckGo search tool to research the person and the organization they work for, based on the email domain or what you find on e.g. LinkedIn and GitHub.
        • If you can't find enough to form a reasonable view, return **None**.
        """
    ),
    tools=[duckduckgo_search_tool()],
    output_type=NativeOutput([Analysis, NoneType]),
)

...
analyze_profile
또한 Profile을 받아 에이전트를 실행하고 Analysis(또는 None)를 반환하는 analyze_profile 헬퍼 함수를 정의하고, Logfire로 계측해요.
...

@logfire.instrument('Analyze profile')
async def analyze_profile(profile: Profile) -> Analysis | None:
    result = await agent.run(profile.as_prompt())
    return result.output

...
분석 저장소 (Analysis store)
다음으로 필요한 빌딩 블록은 지금까지 수행한 모든 분석을 저장해 둘 곳이에요. 매일 요약을 보낼 때 조회할 수 있어야 하니까요.
다행히 Modal은 이후 Modal 실행(웹훅 또는 스케줄)에서 다시 읽을 수 있는 데이터 저장 방법인 modal.Dict를 편리하게 제공해요.
분석을 쉽게 추가·나열·비우는 편의 메서드들을 정의합니다.
...

import modal

...

class AnalysisStore:
    @classmethod
    @logfire.instrument('Add analysis to store')
    async def add(cls, analysis: Analysis):
        await cls._get_store().put.aio(analysis.profile.email, analysis.model_dump())

    @classmethod
    @logfire.instrument('List analyses from store')
    async def list(cls) -> list[Analysis]:
        return [
            Analysis.model_validate(analysis)
            async for analysis in cls._get_store().values.aio()
        ]

    @classmethod
    @logfire.instrument('Clear analyses from store')
    async def clear(cls):
        await cls._get_store().clear.aio()

    @classmethod
    def _get_store(cls) -> modal.Dict:
        return modal.Dict.from_name('analyses', create_if_missing=True)  # pyright: ignore[reportUnknownMemberType]

...
참고
마지막 줄의 # type: ignore에 주목하세요. 아쉽게도 modal은 타입을 완전히 정의하지 않아서, Pydantic AI 코드(예제 포함) 전반에 걸쳐 실행하는 정적 타입 검사기 pyright가 불평하지 않도록 이게 필요해요.
Slack 메시지 보내기 (Send Slack message)
다음으로 실제로 Slack 메시지를 보낼 방법이 필요해요. Slack의 chat.postMessage API를 사용하는 간단한 함수를 정의합니다.
...

API_KEY = os.getenv('SLACK_API_KEY')
assert API_KEY, 'SLACK_API_KEY is not set'


@logfire.instrument('Send Slack message')
async def send_slack_message(channel: str, blocks: list[dict[str, Any]]):
    client = httpx.AsyncClient()
    response = await client.post(
        'https://slack.com/api/chat.postMessage',
        json={
            'channel': channel,
            'blocks': blocks,
        },
        headers={
            'Authorization': f'Bearer {API_KEY}',
        },
        timeout=5,
    )
    response.raise_for_status()
    result = response.json()
    if not result.get('ok', False):
        error = result.get('error', 'Unknown error')
        raise Exception(f'Failed to send to Slack: {error}')

...
기능 (Features)
이제 이 빌딩 블록들을 조합해 원하는 실제 기능을 구현할 수 있어요!
process_slack_member
이 함수는 Profile을 받아 에이전트로 분석하고, AnalysisStore에 추가하며, 분석 결과를 #new-slack-leads 채널로 보냅니다.
...

from .agent import analyze_profile
from .models import Profile

from .slack import send_slack_message
from .store import AnalysisStore

...

NEW_LEAD_CHANNEL = '#new-slack-leads'

...

@logfire.instrument('Process Slack member')
async def process_slack_member(profile: Profile):
    analysis = await analyze_profile(profile)
    logfire.info('Analysis', analysis=analysis)

    if analysis is None:
        return

    await AnalysisStore().add(analysis)

    await send_slack_message(
        NEW_LEAD_CHANNEL,
        [
            {
                'type': 'header',
                'text': {
                    'type': 'plain_text',
                    'text': f'New Slack member with score {analysis.relevance}/5',
                },
            },
            {
                'type': 'divider',
            },
            *analysis.as_slack_blocks(),
        ],
    )

...
send_daily_summary
이 함수는 AnalysisStore의 모든 분석을 나열하고, relevance 기준 상위 5개를 골라 #daily-slack-leads-summary 채널로 보낸 뒤, AnalysisStore를 비워서 다음 일일 실행에서 이 분석들을 다시 처리하지 않게 해요.
...

from .slack import send_slack_message
from .store import AnalysisStore

...

DAILY_SUMMARY_CHANNEL = '#daily-slack-leads-summary'

...

@logfire.instrument('Send daily summary')
async def send_daily_summary():
    analyses = await AnalysisStore().list()
    logfire.info('Analyses', analyses=analyses)

    if len(analyses) == 0:
        return

    sorted_analyses = sorted(analyses, key=lambda x: x.relevance, reverse=True)
    top_analyses = sorted_analyses[:5]

    blocks = [
        {
            'type': 'header',
            'text': {
                'type': 'plain_text',
                'text': f'Top {len(top_analyses)} new Slack members from the last 24 hours',
            },
        },
    ]

    for analysis in top_analyses:
        blocks.extend(
            [
                {
                    'type': 'divider',
                },
                *analysis.as_slack_blocks(include_relevance=True),
            ]
        )

    await send_slack_message(
        DAILY_SUMMARY_CHANNEL,
        blocks,
    )

    await AnalysisStore().clear()

...
웹 앱 (Web app)
지금 상태로는 이 두 함수가 어디에서도 호출되지 않아요.
team_join Slack 웹훅(일명 Slack Events API)을 처리하고 방금 정의한 process_slack_member 함수를 호출하는 FastAPI 엔드포인트를 구현해 볼게요. 안전을 위해 Logfire로 FastAPI도 계측해요.
...

app = FastAPI()
logfire.instrument_fastapi(app, capture_headers=True)


@app.post('/')
async def process_webhook(payload: dict[str, Any]) -> dict[str, Any]:
    if payload['type'] == 'url_verification':
        return {'challenge': payload['challenge']}
    elif (
        payload['type'] == 'event_callback' and payload['event']['type'] == 'team_join'
    ):
        profile = Profile.model_validate(payload['event']['user']['profile'])

        process_slack_member(profile)
        return {'status': 'OK'}

    raise HTTPException(status_code=status.HTTP_422_UNPROCESSABLE_ENTITY)

...
process_slack_member with Modal
여기서 살짝 속임수를 썼어요. functions.py에서 정의한 process_slack_member 함수를 직접 호출하지 않아요. Slack은 웹훅에 3초 안에 응답하길 요구하는데, LLM에 응답하고 웹 검색을 하고 Slack 메시지를 보내려면 그보다 시간이 더 걸리거든요.
대신 앱과 함께 정의된 다음 함수를 호출하는데, 이 함수는 Modal의 modal.Function.spawn 기능을 사용해 함수를 백그라운드로 실행해요. (이 함수의 Modal 쪽이 궁금하다면 앞으로 건너뛰어 보세요.)
modal.py(다음 섹션에서 볼 거예요)가 app.py를 임포트하기 때문에, 함수 정의 안에서 modal.py로부터 임포트를 합니다. 최상위에서 하면 순환 임포트(circular import) 오류가 나거든요.
또한 현재 Logfire 컨텍스트를 함께 넘겨 분산 트레이싱(Distributed Tracing)을 얻어요. 그러면 백그라운드 함수 실행이 웹훅 요청 트레이스 아래에 중첩되어 보여서, 그 요청과 관련된 모든 것이 한곳에 모이게 됩니다.
...

def process_slack_member(profile: Profile):
    from .modal import process_slack_member as _process_slack_member

    _process_slack_member.spawn(
        profile.model_dump(), logfire_ctx=get_context()
    )

...
Modal 앱 (Modal app)
이제 Modal이 이 모든 배포를 얼마나 쉽게 만드는지 볼게요.
Modal 설정하기 (Set up Modal)
가장 먼저 할 일은 Modal 앱을 정의하는 거예요. 사용할 베이스 이미지(Debian with Python 3.13), 필요한 모든 파이썬 패키지, 그리고 런타임 중 사용 가능해야 하는 Modal 인터페이스에 정의된 모든 Secret을 지정합니다.
...

import modal

image = modal.Image.debian_slim(python_version='3.13').pip_install(
    'pydantic',
    'pydantic_ai_slim[openai,duckduckgo]',
    'logfire[httpx,fastapi]',
    'fastapi[standard]',
    'httpx',
)
app = modal.App(
    name='slack-lead-qualifier',
    image=image,
    secrets=[
        modal.Secret.from_name('logfire'),
        modal.Secret.from_name('openai'),
        modal.Secret.from_name('slack'),
    ],
)

...
Logfire 설정하기 (Set up Logfire)
다음으로 Pydantic AI와 HTTPX에 대한 Logfire 계측을 설정하는 함수를 정의해요.
이 작업은 파일 최상위에서 할 수 없어요. 요청된 패키지(가령 logfire)는 Modal에서 실행되는 함수(곧 정의할 것들) 안에서만 사용 가능하거든요. 이 modal.py 파일은 로컬 머신에서 실행되며 modal 패키지만 접근할 수 있어요.
...

def setup_logfire():
    import logfire

    logfire.configure(service_name=app.name)
    logfire.instrument_pydantic_ai()
    logfire.instrument_httpx(capture_all=True)

...
웹 앱 (Web app)
Modal에 웹 엔드포인트를 배포하려면 ASGI 앱(예: FastAPI)을 반환하는 함수를 정의하고 @app.function()과 @modal.asgi_app()으로 데코레이트하기만 하면 돼요.
이 web_app 함수는 Modal에서 실행되므로, 함수 안에서 logfire 패키지가 필요한 setup_logfire 함수를 호출하고 다른 요청 패키지를 쓰는 app.py를 임포트할 수 있어요.
기본적으로 Modal은 함수 호출(웹 요청 등)을 처리할 컨테이너를 요청에 따라(on-demand) 띄워요. 그래서 요청마다 시작 시간이 조금 걸려요. 하지만 Slack은 웹훅에 3초 안에 응답하길 요구하므로 min_containers=1을 지정해 웹 엔드포인트가 항상 떠서 요청에 대비하게 해요. 조금 성가시고 낭비적이긴 하지만, 다행히 Modal의 가격이 꽤 합리적이고 월 $30의 무료 컴퓨팅을 제공하며, 스타트업과 학술 연구자에게는 최대 $50k의 무료 크레딧도 제공해요.
...

@app.function(min_containers=1)
@modal.asgi_app()  # pyright: ignore[reportUnknownMemberType]
def web_app():
    setup_logfire()

    from .app import app as _app

    return _app

...
참고
@modal.asgi_app() 줄의 # type: ignore에 주목하세요. 아쉽게도 modal은 타입을 완전히 정의하지 않아서, Pydantic AI 코드(예제 포함) 전반에 걸쳐 실행하는 정적 타입 검사기 pyright가 불평하지 않도록 이게 필요해요.
스케줄된 send_daily_summary
스케줄 함수를 정의하려면 @app.function() 데코레이터에 schedule 인자를 쓰면 돼요. 이 Modal 함수는 매일 오전 8시(UTC)에 임포트한 send_daily_summary 함수를 호출합니다.
...

@app.function(schedule=modal.Cron('0 8 * * *'))  # Every day at 8am UTC
async def send_daily_summary():
    setup_logfire()

    from .functions import send_daily_summary as _send_daily_summary

    await _send_daily_summary()

...
백그라운드 process_slack_member
마지막으로 백그라운드에서 실행될 수 있도록 process_slack_member 함수를 감싸는 Modal 함수를 정의해요.
웹 앱에서 이 함수를 spawn했을 때 분산 트레이싱을 얻기 위해 Logfire 컨텍스트를 함께 넘겼던 걸 기억할 거예요. 그래서 여기서 그걸 붙여야 합니다.
...

@app.function()
async def process_slack_member(profile_raw: dict[str, Any], logfire_ctx: Any):
    setup_logfire()

    from logfire.propagate import attach_context

    from .functions import process_slack_member as _process_slack_member
    from .models import Profile

    with attach_context(logfire_ctx):
        profile = Profile.model_validate(profile_raw)
        await _process_slack_member(profile)

...
결론 (Conclusion)
이게 전부예요! 이제 사전 준비사항을 충족했다면, 사용법의 명령으로 앱을 실행하거나 배포할 수 있어요.
더 알아보기 (Learn more)
- Modal — 웹 엔드포인트·스케줄·백그라운드 함수를 제공하는 플랫폼.
- Pydantic Logfire — 앱과 에이전트의 관측 가능성.