
의도 탐지: 커스텀 분류기로 사용자 의도를 효율적으로 파악하기
의도 탐지: 커스텀 분류기로 사용자 의도를 효율적으로 파악하기 (Intent Detection: Identify user intent efficiently with a custom classifier)
이 쿡북에서는 Classifier Factory를 이용한 의도 탐지(intent detection)와 분류에 대해 살펴볼 거예요. 단일 타겟(single-target) 분류를 다루는 특정 예제에 집중해서, 데이터 준비부터 파인튜닝, 추론까지 전 과정을 따라가 볼게요.
출처: 문서
본문
이 쿡북에서는 Classifier Factory를 사용한 의도 탐지와 분류에 대해 탐구할 거예요.
단순하게 유지하기 위해, **단일 타겟 분류(single-target classification)**를 다루는 특정 예제에 집중할게요.
데이터셋 (Dataset)
mteb/amazon_massive_intent 데이터셋의 하위 집합을 사용할 거예요. 이 하위 집합에는 다양한 사용자 요청에 대한 의도가 포함되어 있어요.
하위 집합 (Subset)
하위 집합을 다운로드하고 준비해 봅시다. datasets 라이브러리를 설치하고 데이터셋을 로드할게요.
%%capture
!pip install datasets
# @title Loading and preparing subset
%%capture
# Import necessary libraries
from datasets import load_dataset
import pandas as pd
from sklearn.model_selection import train_test_split

# Load the entire amazon_massive_intent dataset
dataset = load_dataset("mteb/amazon_massive_intent")

# Filter for English language samples
train_samples = dataset["train"].filter(lambda x: x["lang"] == "en")

# Select only the required columns
train_samples = train_samples.select_columns(["text", "label_text"])

# Convert to pandas DataFrame
train_df = pd.DataFrame(train_samples)

# Function to remove labels with less than 200 samples and limit each label to 600 samples
def process_labels(df, min_samples=200, max_samples=600):
    label_counts = df["label_text"].value_counts()
    labels_to_keep = label_counts[label_counts >= min_samples].index
    df = df[df["label_text"].isin(labels_to_keep)]

    # Limit each label to max_samples
    balanced_df = pd.DataFrame()
    for label in labels_to_keep:
        label_samples = df[df["label_text"] == label].sample(
            n=min(len(df[df["label_text"] == label]), max_samples), random_state=42
        )
        balanced_df = pd.concat([balanced_df, label_samples])

    return balanced_df

# Process labels in the training dataset
train_df = process_labels(train_df)

# Split the training data into train, validation, and test sets
train_df, temp_df = train_test_split(
    train_df, test_size=0.2, random_state=42, stratify=train_df["label_text"]
)
validation_df, test_df = train_test_split(
    temp_df, test_size=0.5, random_state=42, stratify=temp_df["label_text"]
)
Python
# Display the test DataFrame to verify
test_df
Python
# @title Data distribution
import matplotlib.pyplot as plt
from collections import Counter

# Function to count the number of samples for each label
def count_labels(samples):
    labels = [sample["label_text"] for sample in samples.to_dict("records")]
    return Counter(labels)

# Count labels for each dataset
train_label_counts = count_labels(train_df)
validation_label_counts = count_labels(validation_df)
test_label_counts = count_labels(test_df)

# Create a single figure with subplots for bar charts
fig, axes = plt.subplots(3, 1, figsize=(12, 18))

# Plot the bar charts for label distribution
def plot_label_distribution(ax, label_counts, title):
    # Sort labels by count in descending order
    sorted_labels, sorted_counts = zip(
        *sorted(label_counts.items(), key=lambda x: x[1], reverse=True)
    )
    ax.bar(sorted_labels, sorted_counts, color="skyblue")
    ax.set_ylabel("Count")
    ax.set_title(title)
    ax.tick_params(axis="x", rotation=45)

# Plot label distribution for each dataset
plot_label_distribution(
    axes[0], train_label_counts, "Train Samples (Label Distribution)"
)
plot_label_distribution(
    axes[1], validation_label_counts, "Validation Samples (Label Distribution)"
)
plot_label_distribution(axes[2], test_label_counts, "Test Samples (Label Distribution)")

plt.tight_layout()
plt.show()
데이터 포맷 (Format Data)
이제 데이터셋을 로드했으니, 학습을 위해 업로드할 올바른 원하는 형식으로 변환할 거예요.
데이터는 다음과 같은 JSONL 형식으로 변환돼요.
{"text": "place a birthday party with ale ross and amy in my calendar", "labels": {"intent": "calendar_set"}}
{"text": "new music tracks", "labels": {"intent": "play_music"}}
{"text": "get me the details of upcoming oscar two thousand and seventeen", "labels": {"intent": "calendar_query"}}
{"text": "is there any event today in my calendar", "labels": {"intent": "calendar_query"}}
{"text": "send email to mommy that i'll be going the party", "labels": {"intent": "email_sendemail"}}
...
라벨의 예는 다음과 같아요.
"labels": {
  "intent": "email_sendemail"
}
단일 타겟(single-target) 분류를 위한 것이에요.
Python
from tqdm import tqdm
import json

def dataset_to_jsonl(dataset, output_file):
    # Extract the unique labels from the dataset
    unique_labels = dataset["label_text"].unique()

    # Open the output file in write mode
    with open(output_file, "w") as f:
        # Iterate over each row in the dataset
        for _, row in tqdm(dataset.iterrows(), total=dataset.shape[0]):
            # Extract the text and label from the row
            text = row["text"]
            intent = row["label_text"]

            # Create the JSON object with the desired structure
            json_object = {"text": text, "labels": {"intent": intent}}

            # Write the JSON object to the file as a JSON line
            f.write(json.dumps(json_object) + "\n")

# Save files
dataset_to_jsonl(train_df, "train.jsonl")
dataset_to_jsonl(validation_df, "validation.jsonl")
dataset_to_jsonl(test_df, "test.jsonl")
데이터가 올바르게 변환·저장됐어요. 이제 모델을 학습시킬 수 있어요.
학습 (Training)
모델을 학습시키는 방법은 두 가지예요. la platforme에서 업로드·학습하거나, API를 통해 학습할 수 있어요.
먼저 mistralai를 설치할게요.
%%capture
!pip install mistralai
그리고 클라이언트를 설정해요. 여기에서 API 키를 만들 수 있어요.
from mistralai.client import Mistral
import os

# Set the API key for Mistral
api_key = "API_KEY"

# Set your Weights and Biases key
wandb_key = "WANDB_KEY"

# Initialize the Mistral client
client = Mistral(api_key=api_key)
학습 세트와 검증 세트(선택)의 2개 파일을 업로드할게요. 검증 세트는 검증 손실(validation loss)에 사용됩니다.
# Upload the training data
training_data = client.files.upload(
    file={
        "file_name": "train.jsonl",
        "content": open("train.jsonl", "rb"),
    }
)

# Upload the validation data
validation_data = client.files.upload(
    file={
        "file_name": "validation.jsonl",
        "content": open("validation.jsonl", "rb"),
    }
)
데이터가 업로드됐으니 작업(job)을 만들 수 있어요.
우리는 사용자들이 상당히 많은 지표를 추적할 수 있도록 Weights and Biases 통합을 지원하는데, 이 기능을 적극 권장해요. 프로젝트 이름과 키를 제공하면 사용할 수 있어요.
Python
# Create a fine-tuning job
created_job = client.fine_tuning.jobs.create(
    model="ministral-3b-latest",
    job_type="classifier",
    training_files=[{"file_id": training_data.id, "weight": 1}],
    validation_files=[validation_data.id],
    hyperparameters={"training_steps": 100, "learning_rate": 0.00004},
    auto_start=False,
    integrations=[
        {
            "project": "intent-classifier",
            "api_key": wandb_key,
        }
    ]
)
print(json.dumps(created_job.model_dump(), indent=4))
작업이 생성되면 epoch 수와 같은 세부사항을 검토할 수 있어요. 덕분에 작업을 시작하기 전에 정보를 바탕으로 결정을 내릴 수 있어요.
작업을 가져와서 시작 전에 검증 프로세스가 완료될 때까지 기다릴게요. 이 검증 단계는 작업이 시작할 준비가 되었는지 보장해요.
Python
# Retrieve the job details
retrieved_job = client.fine_tuning.jobs.get(job_id=created_job.id)
print(json.dumps(retrieved_job.model_dump(), indent=4))

import time
from IPython.display import clear_output

# Wait for the job to be validated
while retrieved_job.status not in ["VALIDATED"]:
    retrieved_job = client.fine_tuning.jobs.get(job_id=created_job.id)

    clear_output(wait=True)  # Clear the previous output (User Friendly)
    print(json.dumps(retrieved_job.model_dump(), indent=4))
    time.sleep(1)
이제 작업을 실행할 수 있어요.
Python
# Start the fine-tuning job
client.fine_tuning.jobs.start(job_id=created_job.id)

# Retrieve the job details again
retrieved_job = client.fine_tuning.jobs.get(job_id=created_job.id)
print(json.dumps(retrieved_job.model_dump(), indent=4))
작업이 이제 시작되고 있어요. 상태를 추적하면서 정보를 출력해 볼게요.
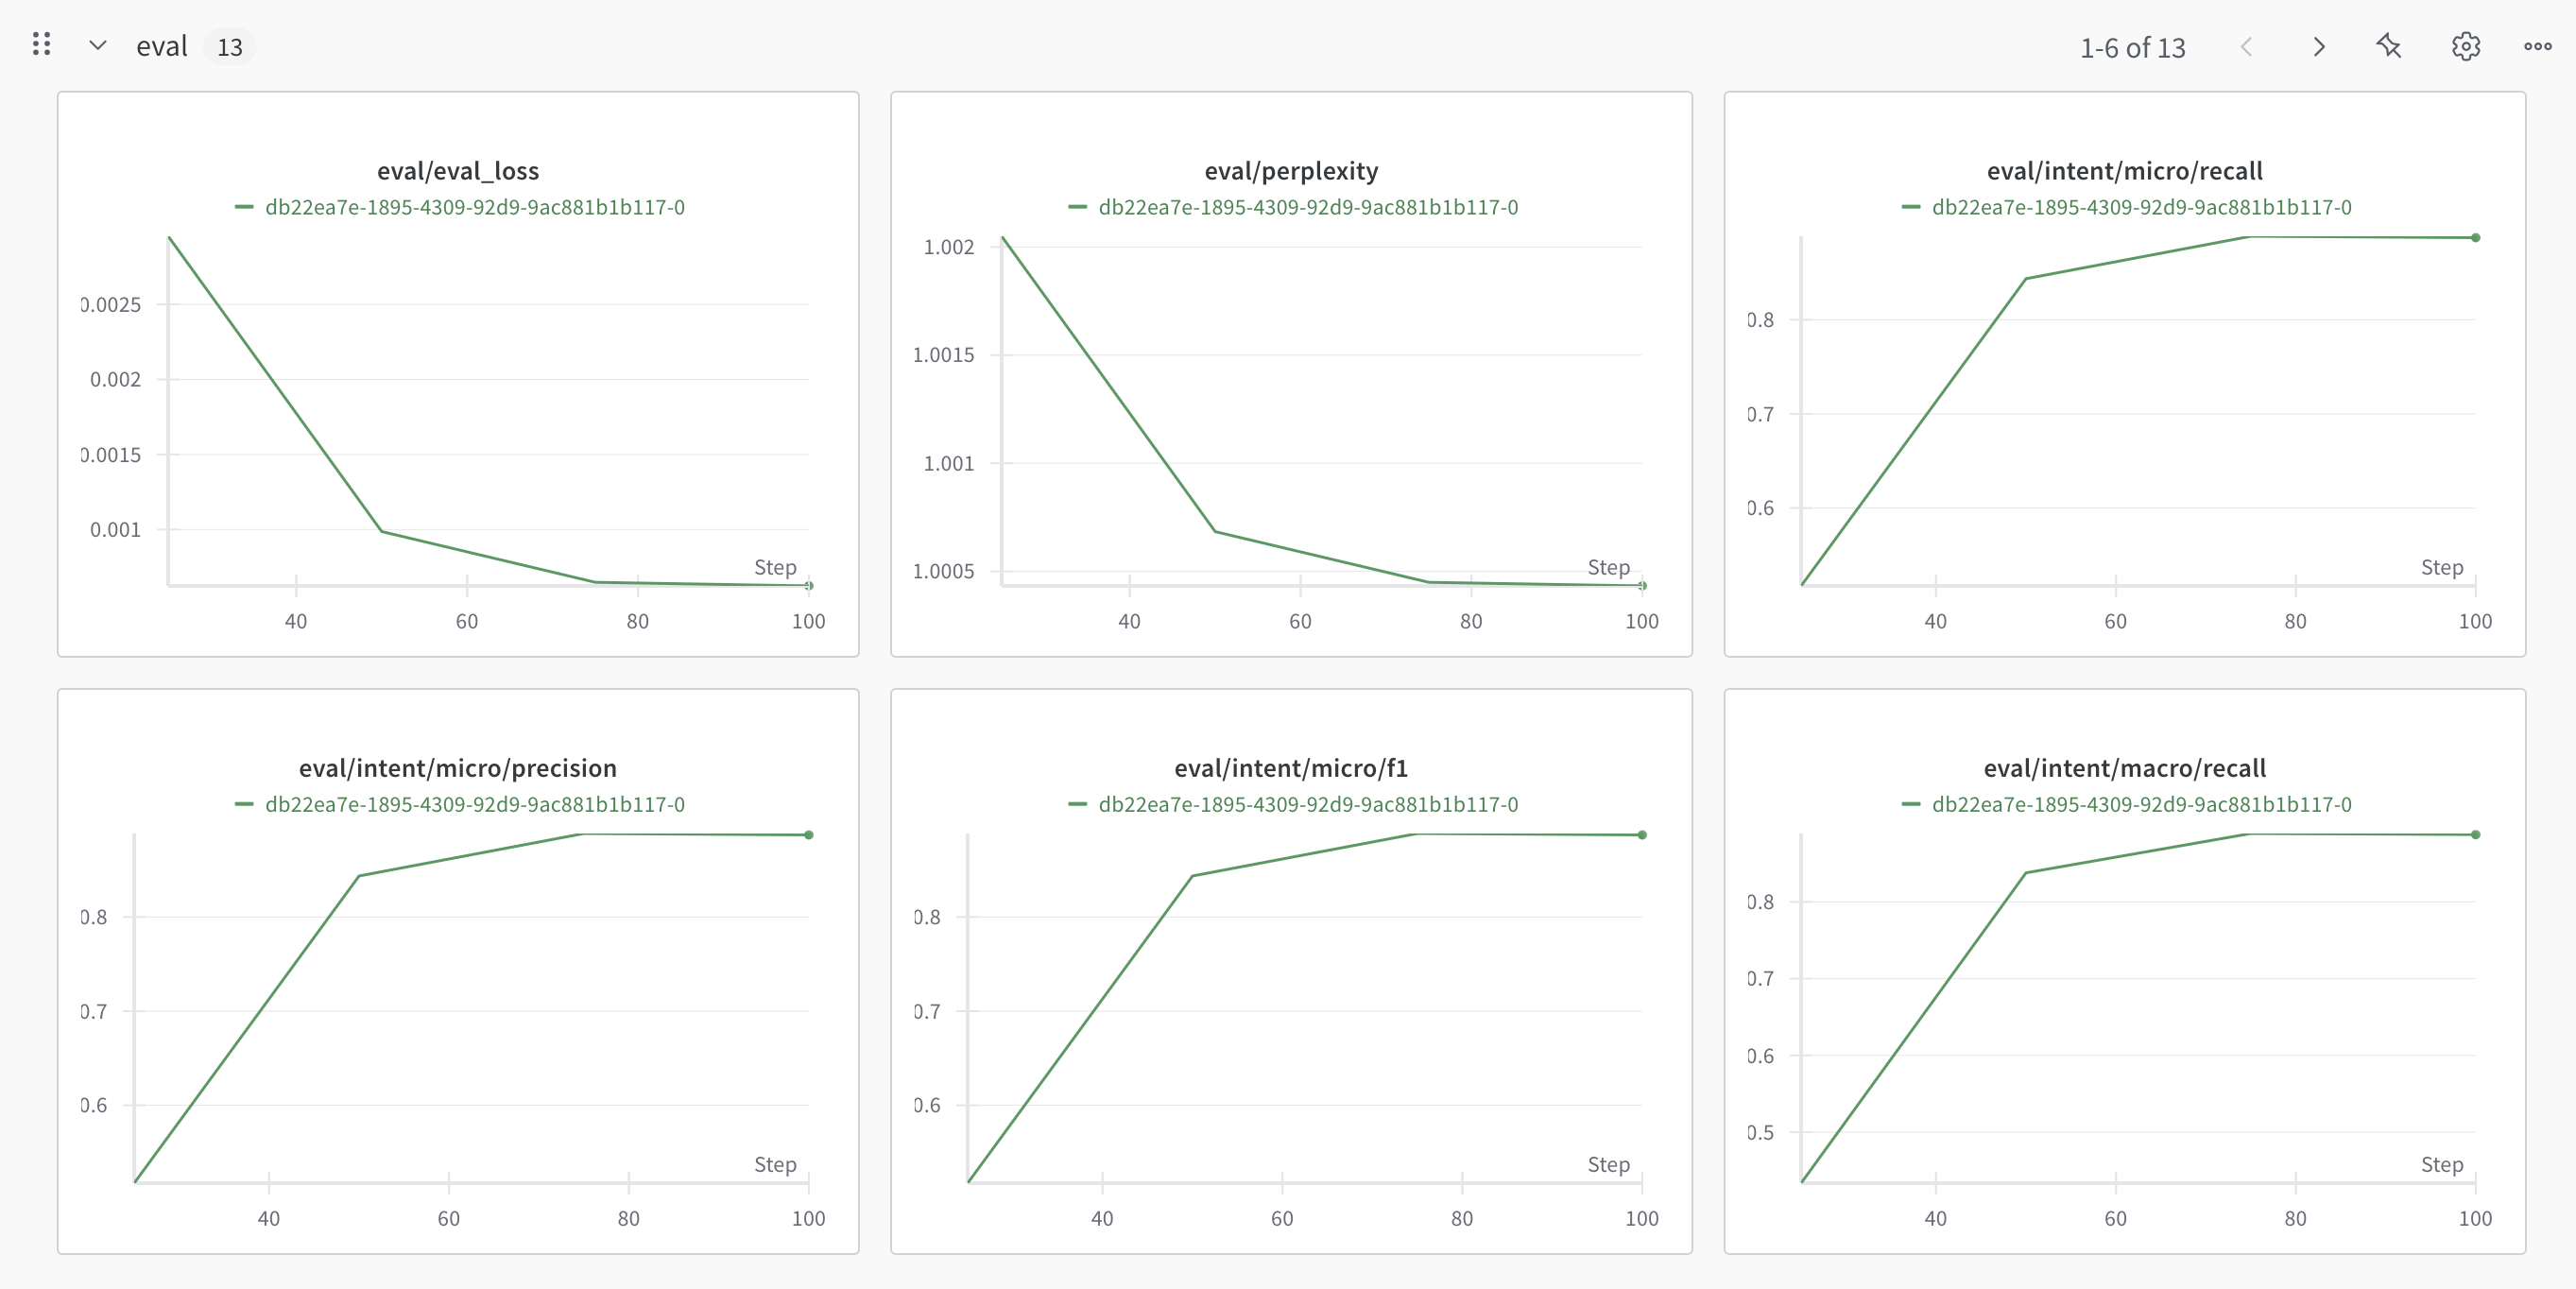
여러 지표를 추적하려면 Weights and Biases 통합 사용을 강력히 권장해요.
WANDB
학습 (Training):
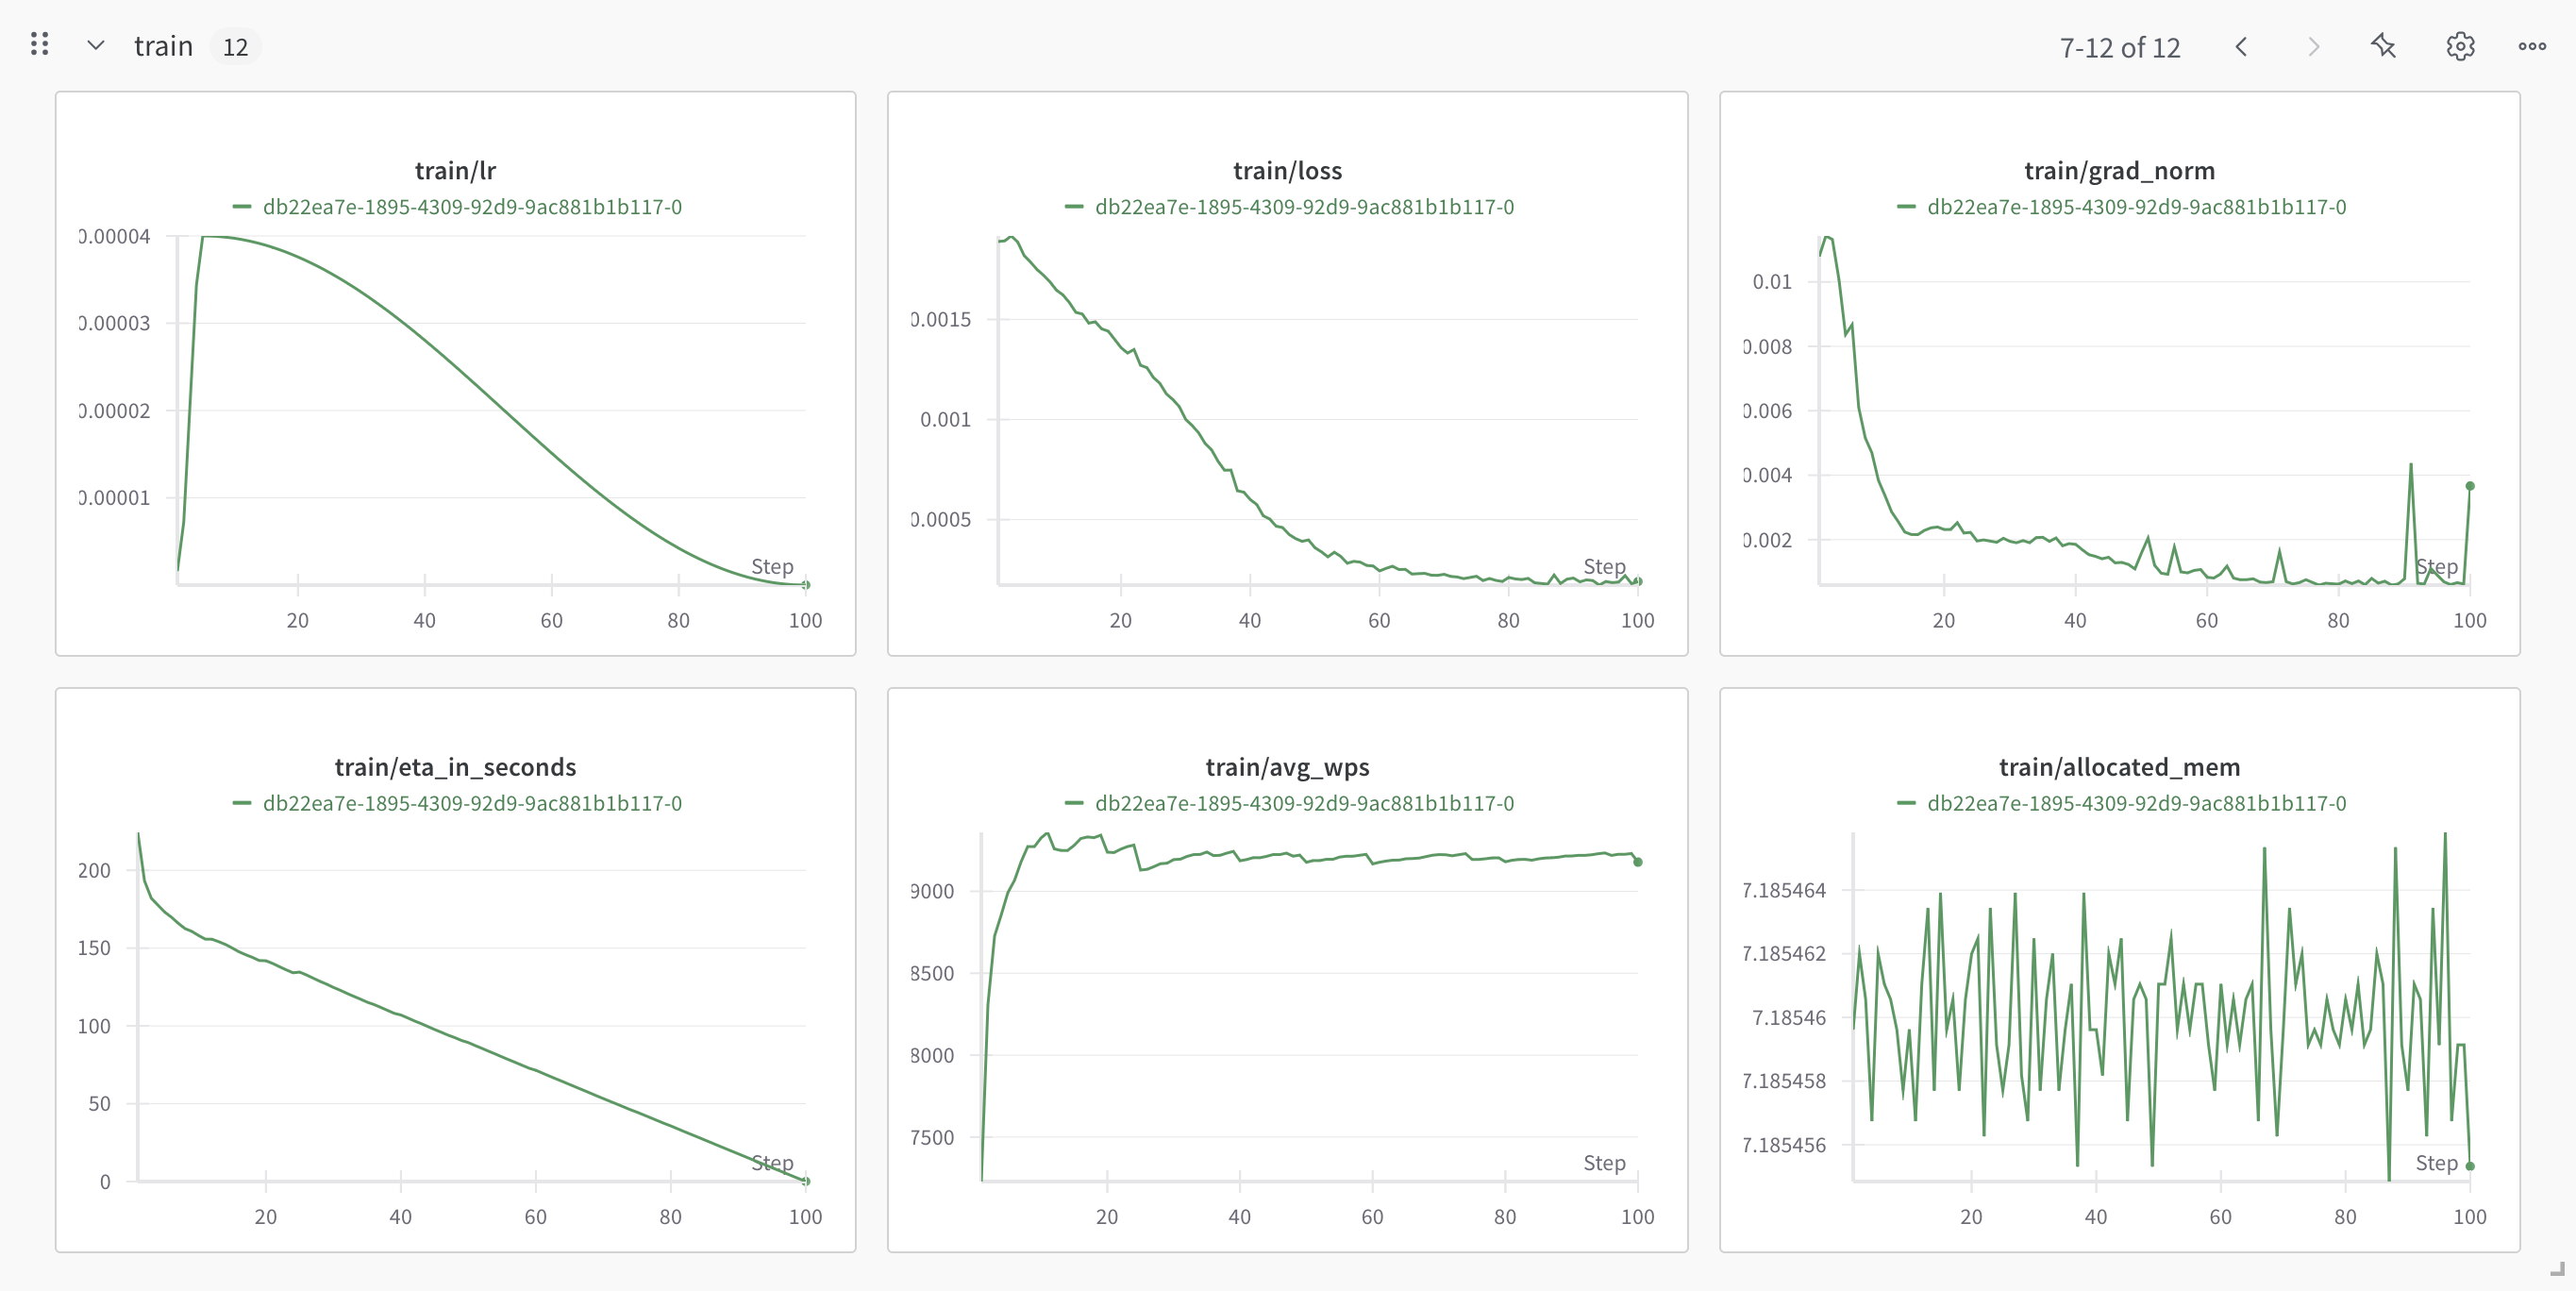
평가/검증 (Eval/Validation):
Python
# Wait for the job to complete
while retrieved_job.status in ["QUEUED", "RUNNING"]:
    retrieved_job = client.fine_tuning.jobs.get(job_id=created_job.id)

    clear_output(wait=True)  # Clear the previous output (User Friendly)
    job_info = json.dumps(retrieved_job.model_dump(), indent=4)
    if len(job_info) > 10000:
        print(job_info[:5000] + "\n[...]\n" + job_info[-5000:])
    else:
        print(job_info)
    time.sleep(5)
추론 (Inference)
모델이 학습되어 사용할 준비가 됐어요! 테스트 세트의 샘플로 테스트해 볼게요.
Python
# Load the test samples
with open("test.jsonl", "r") as f:
    test_samples = [json.loads(l) for l in f.readlines()]

# Classify the first test sample
classifier_response = client.classifiers.classify(
    model=retrieved_job.fine_tuned_model,
    inputs=[test_samples[0]["text"]],
)
print("Text:", test_samples[0]["text"])
print("Classifier Response:", json.dumps(classifier_response.model_dump(), indent=4))
가장 높은 점수의 결과는 weather_query로, 99%가 넘는 점수를 기록했어요!
여기까지가 나만의 분류기를 학습하고 배치 추론을 사용하는 간단한 가이드예요.
더 구체적인 멀티 라벨(multi-label) 분류기에 대해서는 이 쿡북을 방문해 보세요.
**멀티 타겟(multi-target)**에 대한 제품 중심의 심층 가이드와 LLM과 우리 분류기의 평가 비교에 대해서는 이 쿡북을 방문해 보세요.