
임베딩을 이용한 웹 QA
임베딩을 이용한 웹 QA
이 튜토리얼은 웹사이트(이 예시에서는 OpenAI 웹사이트)를 크롤링하고, 크롤링한 페이지를 Embeddings API로 임베딩으로 변환한 다음, 사용자가 임베딩된 정보에 대해 질문할 수 있는 기본적인 검색 기능을 만드는 간단한 예시를 안내해요. 이는 커스텀 지식 베이스를 사용하는 더 정교한 애플리케이션의 시작점으로 의도된 것이에요.
출처: 문서
본문
시작하기
이 튜토리얼에는 Python과 GitHub에 대한 기본 지식이 도움이 돼요. 시작하기 전에 OpenAI API 키를 설정하고 퀵스타트 튜토리얼을 살펴보세요. 이는 API를 최대한 활용하는 방법에 대한 좋은 직관을 줄 거예요.
Python이 OpenAI, Pandas, transformers, NumPy 및 기타 인기 패키지와 함께 주요 프로그래밍 언어로 사용돼요. 이 튜토리얼을 진행하면서 문제가 발생하면 OpenAI Community Forum에 질문해 주세요.
코드를 시작하려면 GitHub에서 이 튜토리얼의 전체 코드를 클론하세요. 또는 따라 하면서 각 섹션을 Jupyter notebook에 복사하고 단계별로 실행하거나, 그냥 읽어도 좋아요. 문제를 피하는 좋은 방법은 새 가상 환경을 만들고 다음 명령을 실행해 필수 패키지를 설치하는 것이에요:
python -m venv env

source env/bin/activate

pip install -r requirements.txt
웹 크롤러 설정
이 튜토리얼의 주요 초점은 OpenAI API이므로, 원한다면 웹 크롤러를 만드는 방법에 대한 맥락을 건너뛰고 소스 코드를 다운로드해도 돼요. 그렇지 않으면 아래 섹션을 펼쳐 스크래핑 메커니즘 구현을 살펴보세요.
웹 크롤러 구축 방법 알아보기
텍스트 형태로 데이터를 얻는 것이 임베딩을 사용하는 첫 번째 단계예요. 이 튜토리얼은 OpenAI 웹사이트를 크롤링해 새 데이터 집합을 만들어요. 이 기술은 자체 회사나 개인 웹사이트에도 사용할 수 있어요.
소스 코드 보기
이 크롤러는 처음부터 작성되었지만 Scrapy 같은 오픈소스 패키지도 이러한 작업에 도움이 될 수 있어요.
이 크롤러는 아래 코드 하단에 전달된 루트 URL에서 시작해 각 페이지를 방문하고, 추가 링크를 찾아 같은 루트 도메인을 가진 한 그 페이지들도 방문해요. 먼저 필수 패키지를 가져오고 기본 URL을 설정하며 HTMLParser 클래스를 정의하세요.
import requests
import re
import urllib.request
from bs4 import BeautifulSoup
from collections import deque
from html.parser import HTMLParser
from urllib.parse import urlparse
import os

# Regex pattern to match a URL
HTTP_URL_PATTERN = r"^http[s]*://.+"

domain = "openai.com"  # <- put your domain to be crawled
full_url = "https://openai.com/"  # <- put your domain to be crawled with https or http


# Create a class to parse the HTML and get the hyperlinks
class HyperlinkParser(HTMLParser):
    def __init__(self):
        super().__init__()
        # Create a list to store the hyperlinks
        self.hyperlinks = []

    # Override the HTMLParser's handle_starttag method to get the hyperlinks
    def handle_starttag(self, tag, attrs):
        attrs = dict(attrs)

        # If the tag is an anchor tag and it has an href attribute, add the href attribute to the list of hyperlinks
        if tag == "a" and "href" in attrs:
            self.hyperlinks.append(attrs["href"])
다음 함수는 URL을 인수로 받아 URL을 열고 HTML 콘텐츠를 읽어요. 그런 다음 그 페이지에서 발견된 모든 하이퍼링크를 반환해요.
# Function to get the hyperlinks from a URL
def get_hyperlinks(url):
    # Try to open the URL and read the HTML
    try:
        with urllib.request.urlopen(url, timeout=30) as response:
            # If the response is not HTML, return an empty list
            if not response.info().get("Content-Type", "").startswith("text/html"):
                return []

            # Decode the HTML
            html = response.read().decode("utf-8")
    except Exception as error:
        print(error)
        return []

    # Create the HTML Parser and then Parse the HTML to get hyperlinks
    parser = HyperlinkParser()
    parser.feed(html)

    return parser.hyperlinks
목표는 OpenAI 도메인 아래에 있는 콘텐츠만 크롤링하고 인덱싱하는 것이에요. 이를 위해 get_hyperlinks 함수를 호출하지만 지정된 도메인의 일부가 아닌 URL을 걸러내는 함수가 필요해요.
# Function to get the hyperlinks from a URL that are within the same domain
def get_domain_hyperlinks(local_domain, url):
    clean_links = []
    for link in set(get_hyperlinks(url)):
        clean_link = None

        # If the link is a URL, check if it is within the same domain
        if re.search(HTTP_URL_PATTERN, link):
            # Parse the URL and check if the domain is the same
            url_obj = urlparse(link)
            if url_obj.netloc == local_domain:
                clean_link = link

        # If the link is not a URL, check if it is a relative link
        else:
            if link.startswith("/"):
                link = link[1:]
            elif link.startswith("#") or link.startswith("mailto:"):
                continue
            clean_link = "https://" + local_domain + "/" + link

        if clean_link is not None:
            if clean_link.endswith("/"):
                clean_link = clean_link[:-1]
            clean_links.append(clean_link)

    # Return the list of hyperlinks that are within the same domain
    return list(set(clean_links))
crawl 함수는 웹 스크래핑 작업 설정의 마지막 단계예요. 방문한 URL을 추적해 사이트의 여러 페이지에 연결될 수 있는 같은 페이지의 반복을 피해요. 또한 HTML 태그 없이 페이지에서 원시 텍스트를 추출하고 텍스트 콘텐츠를 페이지별 로컬 .txt 파일에 써요.
def crawl(url):
    # Parse the URL and get the domain
    local_domain = urlparse(url).netloc

    # Create a queue to store the URLs to crawl
    queue = deque([url])

    # Create a set to store the URLs that have already been seen (no duplicates)
    seen = set([url])

    # Create a directory to store the text files
    if not os.path.exists("text/"):
        os.mkdir("text/")

    if not os.path.exists("text/" + local_domain + "/"):
        os.mkdir("text/" + local_domain + "/")

    # Create a directory to store the csv files
    if not os.path.exists("processed"):
        os.mkdir("processed")

    # While the queue is not empty, continue crawling
    while queue:
        # Get the next URL from the queue
        url = queue.pop()
        print(url)  # for debugging and to see the progress

        # Save text from the url to a <url>.txt file
        page_name = (local_domain + urlparse(url).path).replace("/", "_")
        with open(
            "text/" + local_domain + "/" + page_name + ".txt",
            "w",
            encoding="UTF-8",
        ) as f:
            # Get the text from the URL using BeautifulSoup
            response = requests.get(url, timeout=10)
            response.raise_for_status()
            soup = BeautifulSoup(response.text, "html.parser")

            # Get the text but remove the tags
            text = soup.get_text()

            # If the crawler gets to a page that requires JavaScript, it will stop the crawl
            if "You need to enable JavaScript to run this app." in text:
                print(
                    "Unable to parse page " + url + " due to JavaScript being required"
                )

            # Otherwise, write the text to the file in the text directory
            f.write(text)

        # Get the hyperlinks from the URL and add them to the queue
        for link in get_domain_hyperlinks(local_domain, url):
            if link not in seen:
                queue.append(link)
                seen.add(link)


crawl(full_url)
위 예시의 마지막 줄은 접근 가능한 모든 링크를 통과해 그 페이지들을 텍스트 파일로 바꾸는 크롤러를 실행해요. 사이트의 크기와 복잡성에 따라 실행하는 데 몇 분이 걸릴 수 있어요.
임베딩 인덱스 구축
CSV는 임베딩을 저장하는 일반적인 형식이에요. 이 형식을 Python에서 사용하려면 원시 텍스트 파일(텍스트 디렉터리에 있는)을 Pandas 데이터 프레임으로 변환하면 돼요. Pandas는 행과 열에 저장된 데이터(표 형식 데이터)를 다루는 데 도움이 되는 인기 있는 오픈소스 라이브러리예요.
빈 줄은 텍스트 파일을 어지럽히고 처리하기 어렵게 만들 수 있어요. 간단한 함수가 그 줄을 제거하고 파일을 정리할 수 있어요.
def remove_newlines(serie):
    serie = serie.str.replace("\n", " ")
    serie = serie.str.replace("\\n", " ")
    serie = serie.str.replace("  ", " ")
    serie = serie.str.replace("  ", " ")
    return serie
텍스트를 CSV로 변환하려면 이전에 만든 텍스트 디렉터리의 텍스트 파일을 반복해야 해요. 각 파일을 연 후 여분의 공백을 제거하고 수정된 텍스트를 목록에 추가하세요. 그런 다음 새 줄이 제거된 텍스트를 빈 Pandas 데이터 프레임에 추가하고 데이터 프레임을 CSV 파일에 써요.
여분의 공백과 새 줄은 텍스트를 어지럽히고 임베딩 과정을 복잡하게 만들 수 있어요. 여기 사용된 코드는 그 중 일부를 제거하는 데 도움이 되지만, 제3자 라이브러리나 다른 방법이 더 불필요한 문자를 제거하는 데 유용할 수 있어요.
import pandas as pd

# Create a list to store the text files
texts = []

# Get all the text files in the text directory
for file in os.listdir("text/" + domain + "/"):
    # Open the file and read the text
    with open("text/" + domain + "/" + file, "r", encoding="UTF-8") as f:
        text = f.read()

        page_name = Path(file).stem
        domain_prefix = f"{domain}_"
        if page_name.startswith(domain_prefix):
            page_name = page_name[len(domain_prefix) :]
        elif page_name == domain:
            page_name = "index"

        # Replace -, _, and #update with spaces.
        texts.append(
            (
                page_name.replace("-", " ").replace("_", " ").replace("#update", ""),
                text,
            )
        )

# Create a dataframe from the list of texts
df = pd.DataFrame(texts, columns=["fname", "text"])

# Set the text column to be the raw text with the newlines removed
df["text"] = df.fname + ". " + remove_newlines(df.text)
df.to_csv("processed/scraped.csv")
df.head()
원시 텍스트를 CSV 파일에 저장한 후 다음 단계는 토큰화(tokenization)예요. 이 과정은 문장과 단어를 분해해 입력 텍스트를 토큰으로 나눠요. 문서에서 Tokenizer를 확인하면 시각적 데모를 볼 수 있어요.
유용한 경험칙: 일반 영어 텍스트에서 하나의 토큰은 일반적으로 텍스트 약 4자에 해당해요. 이는 단어의 약 ¾에 해당해요(100 토큰 ~= 75 단어).
API에는 임베딩에 대한 최대 입력 토큰 수 제한이 있어요. 한도 아래로 유지하려면 CSV 파일의 텍스트를 여러 행으로 나눠야 해요. 각 행의 기존 길이를 먼저 기록해 어떤 행을 분할해야 하는지 식별해요.
import tiktoken

# Load the cl100k_base tokenizer which is designed to work with the ada-002 model
tokenizer = tiktoken.get_encoding("cl100k_base")

df = pd.read_csv("processed/scraped.csv", index_col=0)
df.columns = ["title", "text"]

# Tokenize the text and save the number of tokens to a new column
df["n_tokens"] = df.text.apply(lambda x: len(tokenizer.encode(x)))

# Visualize the distribution of the number of tokens per row using a histogram
df.n_tokens.hist()
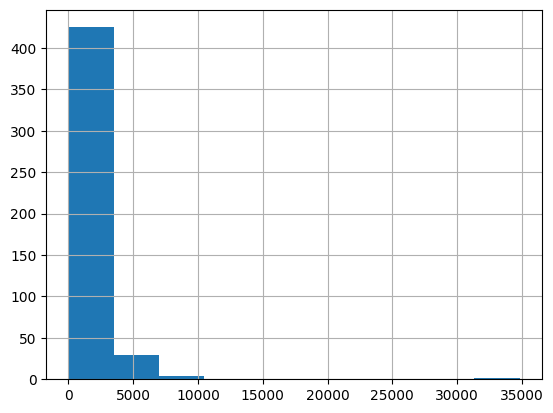
최신 임베딩 모델은 최대 8191 입력 토큰까지 처리할 수 있으므로 대부분의 행은 청킹이 필요하지 않지만, 스크랩된 모든 하위 페이지가 그런 것은 아닐 수 있어 더 긴 줄을 더 작은 청크로 나눠야 해요.
max_tokens = 500


# Function to split the text into chunks of a maximum number of tokens
def split_into_many(text, max_tokens=max_tokens):

    # Split the text into sentences
    sentences = text.split(". ")

    # Get the number of tokens for each sentence
    n_tokens = [len(tokenizer.encode(" " + sentence)) for sentence in sentences]

    chunks = []
    tokens_so_far = 0
    chunk = []

    # Loop through the sentences and tokens joined together in a tuple
    for sentence, token in zip(sentences, n_tokens):
        # If the number of tokens so far plus the number of tokens in the current sentence is greater
        # than the max number of tokens, then add the chunk to the list of chunks and reset
        # the chunk and tokens so far
        if tokens_so_far + token > max_tokens:
            chunks.append(". ".join(chunk) + ".")
            chunk = []
            tokens_so_far = 0

        # If the number of tokens in the current sentence is greater than the max number of
        # tokens, go to the next sentence
        if token > max_tokens:
            continue

        # Otherwise, add the sentence to the chunk and add the number of tokens to the total
        chunk.append(sentence)
        tokens_so_far += token + 1

    return chunks


shortened = []

# Loop through the dataframe
for row in df.iterrows():
    # If the text is None, go to the next row
    if row[1]["text"] is None:
        continue

    # If the number of tokens is greater than the max number of tokens, split the text into chunks
    if row[1]["n_tokens"] > max_tokens:
        shortened += split_into_many(row[1]["text"])

    # Otherwise, add the text to the list of shortened texts
    else:
        shortened.append(row[1]["text"])
업데이트된 히스토그램을 다시 시각화하면 행이 짧은 섹션으로 성공적으로 분할되었는지 확인하는 데 도움이 될 수 있어요.
df = pd.DataFrame(shortened, columns=["text"])
df["n_tokens"] = df.text.apply(lambda x: len(tokenizer.encode(x)))
df.n_tokens.hist()
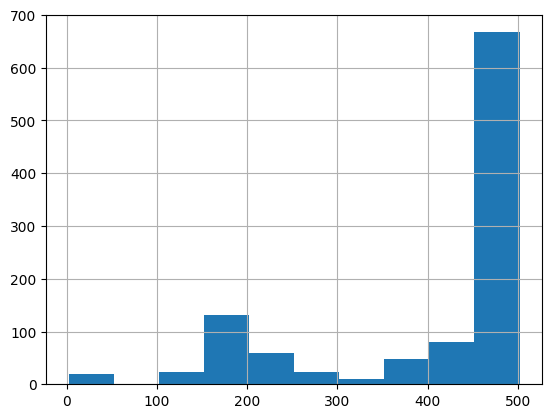
콘텐츠는 이제 더 작은 청크로 분해되었고, 새 text-embedding-ada-002 모델의 사용을 지정해 임베딩을 생성하는 간단한 요청을 OpenAI API에 보낼 수 있어요:
from openai import OpenAI

client = OpenAI()

df["embeddings"] = df.text.apply(
    lambda x: client.embeddings.create(
        input=x, model="text-embedding-3-small"
    ).data[0].embedding
)

df.to_csv("processed/embeddings.csv")
df.head()
이 작업은 약 3~5분이 걸리지만, 그 후에는 사용할 준비가 된 임베딩을 갖게 돼요!
임베딩으로 질문 답변 시스템 구축
임베딩이 준비되었고 이 과정의 마지막 단계는 간단한 질문 답변 시스템을 만드는 것이에요. 이 시스템은 사용자의 질문을 받아 그 임베딩을 만들고 기존 임베딩과 비교해 스크랩된 웹사이트에서 가장 관련 있는 텍스트를 검색해요. 그런 다음 gpt-3.5-turbo-instruct 모델이 검색된 텍스트를 기반으로 자연스러운 답변을 생성해요.
임베딩을 NumPy 배열로 변환하는 것이 첫 번째 단계예요. 이는 NumPy 배열에서 작동하는 많은 함수가 있어 사용 방법에 더 많은 유연성을 제공하고, 차원을 1-D로 평면화하는데 이는 많은 후속 연산에 필요한 형식이에요.
import numpy as np

df = pd.read_csv("processed/embeddings.csv", index_col=0)
df["embeddings"] = df["embeddings"].apply(eval).apply(np.array)

df.head()
데이터가 준비되었으니 이제 간단한 함수로 질문을 임베딩으로 변환해야 해요. 이는 임베딩을 사용한 검색이 코사인 거리(cosine distance)를 사용해 숫자 벡터(원시 텍스트의 변환)를 비교하기 때문에 중요해요. 벡터가 코사인 거리에서 가까우면 관련이 있고 질문의 답변일 수 있어요. OpenAI Python 패키지에는 여기서 유용한 내장 distances_from_embeddings 함수가 있어요.
def create_context(question, df, max_len=1800, size="ada"):
    """
    Create a context for a question by finding the most similar context from the dataframe
    """

    # Get the embeddings for the question
    q_embeddings = (
        client.embeddings.create(input=question, model="text-embedding-3-small")
        .data[0]
        .embedding
    )

    # Get the distances from the embeddings
    df["distances"] = distances_from_embeddings(
        q_embeddings, df["embeddings"].values, distance_metric="cosine"
    )

    returns = []
    cur_len = 0

    # Sort by distance and add the text to the context until the context is too long
    for _, row in df.sort_values("distances", ascending=True).iterrows():
        # Add the length of the text to the current length
        cur_len += row["n_tokens"] + 4

        # If the context is too long, break
        if cur_len > max_len:
            break

        # Else add it to the text that is being returned
        returns.append(row["text"])

    # Return the context
    return "\n\n###\n\n".join(returns)
텍스트는 더 작은 토큰 집합으로 분해되었으므로 오름차순으로 반복하고 텍스트를 계속 추가하는 것은 완전한 답변을 보장하는 중요한 단계예요. 원하는 것보다 더 많은 콘텐츠가 반환되면 max_len을 더 작게 수정할 수도 있어요.
이전 단계는 질문과 의미론적으로 관련된 텍스트 청크만 검색했으므로 답변을 포함할 수는 있지만 보장은 없어요. 답변을 찾을 확률은 상위 5개의 가장 가능성이 높은 결과를 반환함으로써 더 높일 수 있어요.
그런 다음 답변 프롬프트는 일관된 답변을 구성하기 위해 검색된 컨텍스트에서 관련 사실을 추출하려 시도해요. 관련 답변이 없으면 프롬프트는 "I don't know"를 반환해요.
gpt-3.5-turbo-instruct를 사용한 completion 엔드포인트로 질문에 대한 현실적인 답변을 만들 수 있어요.
def answer_question(
    df,
    model="gpt-3.5-turbo-instruct",
    question="Am I allowed to publish model outputs to Twitter, without a human review?",
    max_len=1800,
    size="ada",
    debug=False,
    max_tokens=150,
    stop_sequence=None,
):
    """
    Answer a question based on the most similar context from the dataframe texts
    """
    context = create_context(
        question,
        df,
        max_len=max_len,
        size=size,
    )
    # If debug, print the raw model response
    if debug:
        print("Context:\n" + context)
        print("\n\n")

    try:
        # Create a completion using the question and context
        response = client.completions.create(
            model=model,
            prompt=(
                "Answer the question based on the context below, and if the "
                "question can't be answered based on the context, say "
                '"I don\'t know"'
                f"\n\nContext: {context}\n\n---\n\nQuestion: {question}\nAnswer:"
            ),
            temperature=0,
            max_tokens=max_tokens,
            top_p=1,
            frequency_penalty=0,
            presence_penalty=0,
            stop=stop_sequence,
        )
        return response.choices[0].text.strip()
    except Exception as error:
        print(error)
        return ""
완료됐습니다! OpenAI 웹사이트에서 임베딩된 지식을 가진 작동하는 Q/A 시스템이 준비되었어요. 몇 가지 빠른 테스트를 통해 출력 품질을 확인할 수 있어요:
answer_question(df, question="What day is it?", debug=False)

answer_question(df, question="What is our newest embeddings model?")

answer_question(df, question="What is ChatGPT?")
응답은 다음과 비슷하게 보여요:
"I don't know."

'The newest embeddings model is text-embedding-ada-002.'

'ChatGPT is a model trained to interact in a conversational way. It is able to answer followup questions, admit its mistakes, challenge incorrect premises, and reject inappropriate requests.'
시스템이 예상되는 질문에 답할 수 없으면 원시 텍스트 파일을 검색해 예상되는 정보가 실제로 임베딩되었는지 확인해 볼 가치가 있어요. 처음 수행한 크롤링 과정은 원래 제공된 도메인 외부의 사이트를 건너뛰도록 설정되었으므로, 하위 도메인 설정이 있었다면 그 지식이 없을 수 있어요.
현재 데이터 프레임은 질문에 답할 때마다 전달되고 있어요. 더 프로덕션적인 워크플로에서는 임베딩을 CSV 파일에 저장하는 대신 벡터 데이터베이스 솔루션을 사용해야 하지만, 현재 접근 방식은 프로토타이핑에 훌륭한 옵션이에요.